Saturday, October 31, 2020

Sketch Saturday

 Hi Everyone,

Sketch Saturday's 2020 sponsor is Riley and Company


Riley and Company is the original home of snark.
Please stop by their website and 
check out the great selection of sentiments to tickle your Funny Bone!

We are grateful for our sponsor's support.

Our winner of this weeks' challenge will win a prize from our sponsor!


Here is the sketch #634:

Pick a sketch from 2015

I used an image and a sentiment from Riley and Company on my sketch #342 from 2015:


We would love it if you'd join in with our sketch this week.  You can enter at Sketch Saturday.


Friday, October 30, 2020

KLM Designs Mail woman Gnome

 KLM Digital Designs has some really adorable images and if you haven't checked them out you really should. They have both digital images and Photopolymer stamps.


One of the new images for October, in digital stamp form, is the Mail Woman GnomeI used the digital image and printed it onto some Cryogen card stock and colored with Copics.  I cut it out using my Scan N Cut.  For my card today, I  layered some blue card stock onto my card base.  I then layered some striped designer card stock on top of the blue.  I attached a couple strips of different designer card stock to the card front. I attached my image and added a few pearls to finish it off.  I also used a sentiment that comes with the digital image and attached it to the top of the card.


Copics used:
Skin - E11, E00, E000
hair - YR24, YR23, YR21
blues - B16, B14, B12
browns - E44, E43, E41
black - N9, N7, N5

You can find more inspiration at KLM DesignsKLM Digital Design Team and KLM Digital Designs on the Facebook Fan page from the design team.


Thanks for stopping by,


Outlawz Festive Fridays

  Friday has arrived! And so has a new Outlawz Festive Friday's Challenge. Here is my DT card using an image by Bugaboo, our sponsor this month.  Our themes this challenge are  Winter, Birthday, Christmas, Anything Goes!


Here's my card: Using a digital image by Bugaboo:


Check out the The Outlawz Challenges Fan Facebook page for some more inspiration.


Wednesday, October 28, 2020

ScraPerfect Triple Cube Card

 Hello fellow crafters!!  Dawn here with you today, to share a Triple Cube Card!  I love working with the Best Glue Ever  and the No Clog Writing cap.  If you haven't tried them, you are missing out on some awesome products. 

To start off, you need a sheet of 8 1/2 x 11 card stock.  You will score on the short side at 2", 4", 6" and 8".  After scoring you will cut on the long side, one strip 4" x 8 1/2" and two strips at 2" x 8 1/2".  You will have a 3" piece left over.

Fold the pieces on the score lines. Add the Best Glue Ever  and the No Clog Writing cap to the 1/2" end and fold to form a cube. Do this for all 3 pieces.

Lay the big cube down flat and attach the smaller cubes to the bottom square using the Best Glue Ever  and the No Clog Writing cap.


Then you decorate as you please.  I made a Christmas card using some snowflake papers and die cuts. I used the Best Glue Ever  and the No Clog Writing cap to adhere the pieces together and to attach to the cubes.


Here is the finished card. It does fold flat.


That's it for today - until next time. Happy Crafting with ScraPerfect!!

ScraPerfect Products Used:


KLM Designs School Boy

 KLM Digital Designs has some really adorable images and if you haven't checked them out you really should. They have both digital images and Photopolymer stamps.


One of the new images for October, in digital stamp form, is the School BoyI used the digital image and printed it onto some Cryogen card stock and colored with Copics.  I cut it out using my Scan N Cut.  For my card today, I  layered some blue card stock onto my card base.  I then layered some striped designer card stock on top of the blue.  I attached a couple strips of different designer card stock to the card front. I attached my image. I also used a sentiment that comes with the digital image and attached it to the top of the card.

Here's a closer peek at my colored image:


Copics used:

skin - E11, E00, E000
hair - E37, E35, E31
pants - B97, B95, B93, B91
shirt - G28, G24, G21, G20
shoes - E44, E43, E41
backpack - B26, B24, B23, B21
apple - R39, R37, R35, R32


You can find more inspiration at KLM DesignsKLM Digital Design Team and KLM Digital Designs on the Facebook Fan page from the design team.


Thanks for stopping by,


Thursday, October 22, 2020

Scrapping 4 Fun Challenges #178

  We have a new Challenge at Scrapping4funChallenges.


The Theme for Challenge 178 - Autumn

If you like to play along and join us in the fun, hop over to Scrapping4funChallenges.

Our lovely Sponsors are:


I used the image Kawaii Big Eye Girl Shannon:


Copics used:
skin - E11, E00, E000, R20
hair - E37, E35, E33, E31
pinks - R85, R83, R81
teals - BG02


Don't forget to join in the fun at Scrapping4funChallenges.


Thanks for looking and Happy Crafting!!!!!


KLM Designs Three Witches

  KLM Digital Designs has some really adorable images and if you haven't checked them out you really should. They have both digital images and Photopolymer stamps.


One of the new images for October, in digital stamp form, is the Three WitchesI used the digital image and printed it onto some Cryogen card stock and colored with Copics.  I cut it out using my Scan N Cut.  For my card today, I  layered some green card stock onto my card base.  I then layered some plaid designer card stock on top of the green.  I attached a couple strips of different designer card stock to the card front. I attached my image and added a few pearls to finish it off.  I also used a sentiment that comes with the digital image and attached it to the top of the card.


You can find more inspiration at KLM DesignsKLM Digital Design Team and KLM Digital Designs on the Facebook Fan page from the design team.


Thanks for stopping by,


Tuesday, October 20, 2020

Sheepski Designs Vlad N Mia


I'm excited to show you my creation for Sheepski Designs.  This is another post using one of their wonderful images called "Vlad N Mia". 


Check out our Facebook page for some more inspiration using Sheepski Design images.


Saturday, October 17, 2020

KLM Designs

 KLM Digital Designs has some really adorable images and if you haven't checked them out you really should. They have both digital images and Photopolymer stamps.


One of the new images for October, in digital stamp form, is the Jack O'Lantern Gnome. I used the digital image and printed it onto some Cryogen card stock and colored with Copics.  I cut it out using my Scan N Cut.  I used some oval dies for the orange and green mats. For my card today, I  layered some green card stock onto my card base.  I then layered some diagonal stripe designer card stock on top of the green.  I attached some brown twine to both sides of the card front. I attached my matted image and added a few enamel dots and a bow to finish it off.  I also used a sentiment that comes with the digital image and attached it to the top of the card.

Entered in the following challenges:

https://twooldbatshalloweenchallenge.blogspot.com


You can find more inspiration at KLM DesignsKLM Digital Design Team and KLM Digital Designs on the Facebook Fan page from the design team.


Thanks for stopping by,


Sketch Saturday

 Hi Everyone,

Sketch Saturday's 2020 sponsor is Riley and Company


Riley and Company is the original home of snark.
Please stop by their website and 
check out the great selection of sentiments to tickle your Funny Bone!

We are grateful for our sponsor's support.

Our winner of this weeks' challenge will win a prize from our sponsor!


Here is the sketch #632:


I used sentiment from Riley and Company:


We would love it if you'd join in with our sketch this week.  You can enter at Sketch Saturday.


Friday, October 16, 2020

Outlawz Festive Fridays

  Friday has arrived! And so has a new Outlawz Festive Friday's Challenge. Here is my DT card using an image by Bugaboo, our sponsor this month.  Our themes this week are  Halloween, Birthday, Christmas, Milestones!


Here's my card: Using a digital image by Bugaboo:


Check out the The Outlawz Challenges Fan Facebook page for some more inspiration.

Wednesday, October 14, 2020

Crafty Gals Corner #212

 It's time for another challenge with us at the  Crafty Gals Corner

This week we are letting out creative Juices flow with Challenge #212 - Halloween Colors

Crafty Gals Corner Challenges are monthly.

Each crafter may only submit 3 projects per challenge

Our Sponsors for this challenge are:


                                               Ike's Art
                                                            Prize ~ $10 Gift Certificate


Prize ~ 2 Digital Images


Prize ~ 3 Single Digital Images


Here is my project Using: Trick or Treat Witch - Stamper’s Delight:


The image is colored with these copics:


Skin - E11, E00, E000, R20
hair - N9, N7, N5
purples - V17, V15, V12
oranges - YR07, YR04, YR02
yellows - Y17, Y13, Y11
greens - YG25


A closer peek at the colored image:


Hope you enjoyed your visit

Come see all the DT projects at Crafty Gals Corner Challenges and enter your creations. We'd love to see them......


Monday, October 12, 2020

ScraPerfect Two Tiered Box

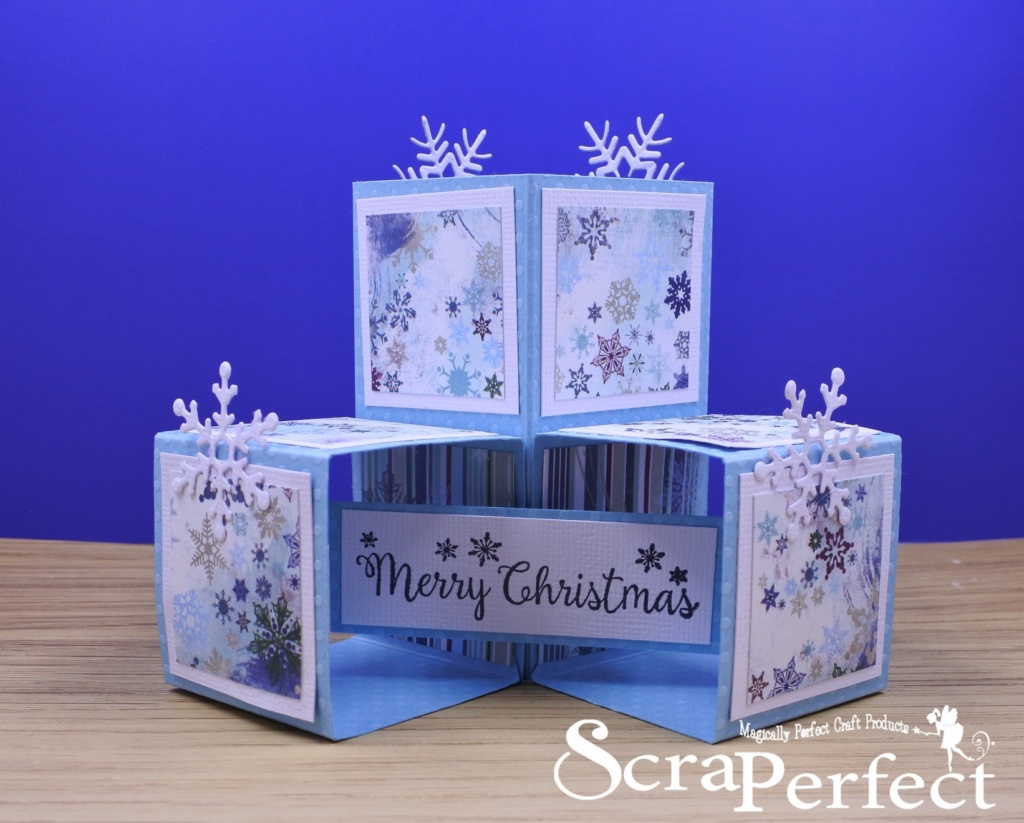
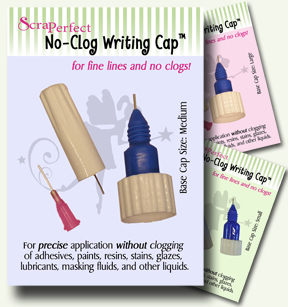
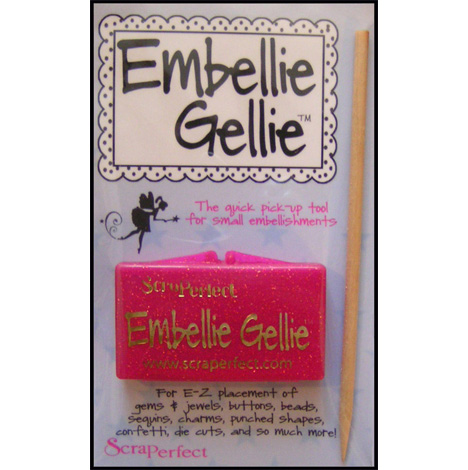
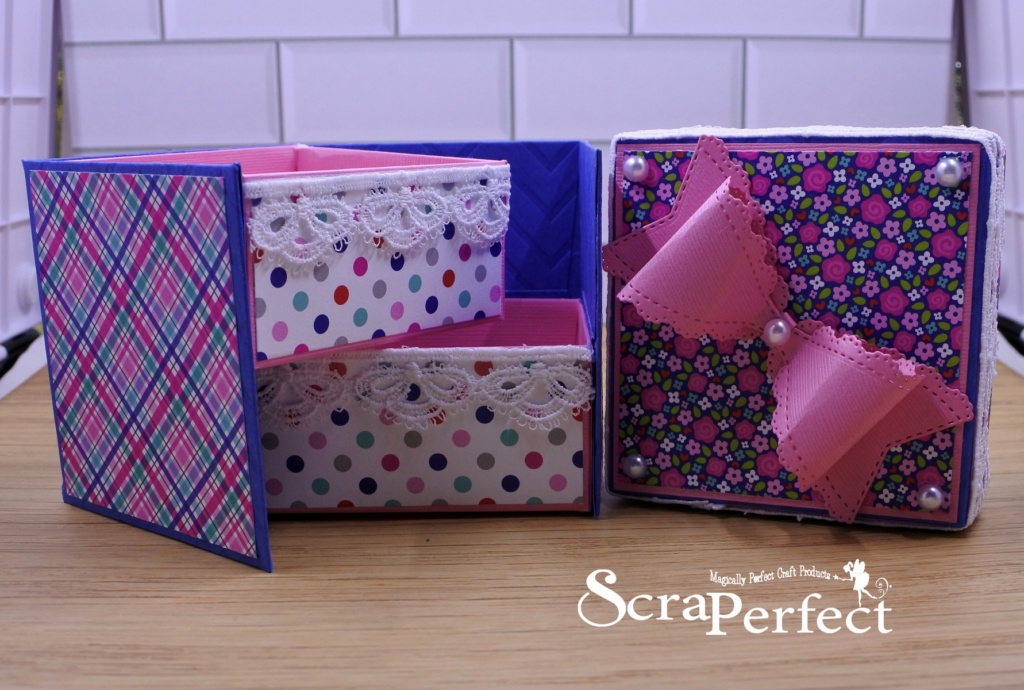
 Hello fellow crafters!!  I'm here with you today, to share a Two Tiered Box!  I love working with the Best Glue Ever  , the Embellie Gellie  and the No Clog Writing cap.  If you haven't tried them, you are missing out on some awesome products. 

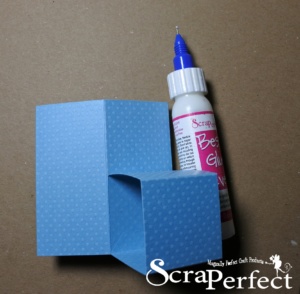
To make the Two Tiered Box, you will need the following:  cardstock, scoreboard, The Best Glue Ever with the No Clog Writing capEmbellie Gellie for picking up the flat backed pearls, and dies if you want to use any to decorate your box and some embellishments like pearls, lace, ribbon, etc......

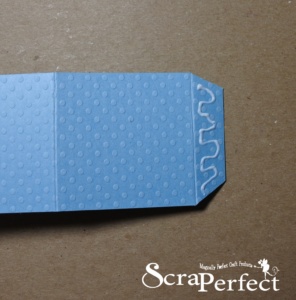
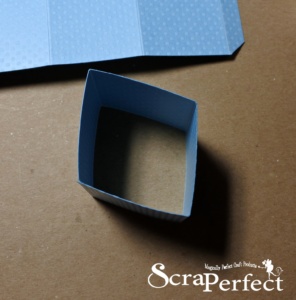
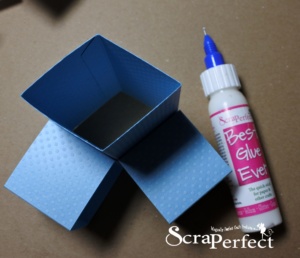
For the lid you will need a piece of card stock 7 1/4 x 7 1/4. You will score at 1, 2, 5 1/4 and 6 1/4. Turn card stock 90 degrees and score again at 1, 2, 5 1/4 and 6 1/4.  Fold and burnish all score lines.  Remove the 3 outside squares at all 4 corners.  Using the Best Glue Ever , Glue the tabs and assemble the box lid:


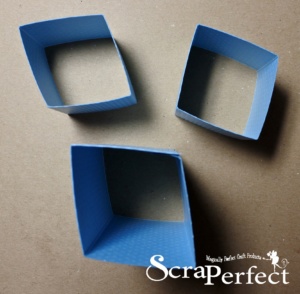
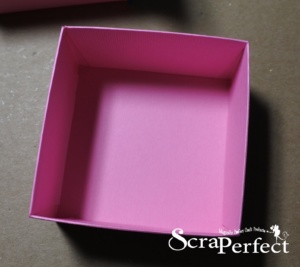
For the 2 drawers you will need 2 pieces of card stock at 9 x 9.  You will score at 1 1/2, 3, 6 and 7 1/2.  Turn 90 degrees and score again at 1 1/2, 3, 6 and 7 1/2.  Fold and burnish all score lines.  Remove the 3 outside squares at all 4 corners.  Using the Best Glue Ever , glue the tabs and assemble the drawers. 


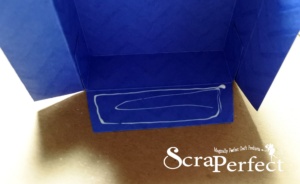
For the sides of the box, you will need a piece of card stock that is 6 1/2 x 6 3/4, scored at 1/2, 3 5/8 turn with the 3 5/8 section towards the top of the scoreboard and score at 1 5/8 and 4 7/8.  The next piece of card stock that is 6 1/2 x 7 1/4, scored at 1/2, 3 5/8 and 6 3/4, rotate and score at 1 5/8 and 4 7/8.  You will want to make tabs by cutting off the bottom and top 1/2 sections.  Next we are going to join these 2 pieces.  Lay the piece with one tab down, attach one of the tabs on the second piece to the side of the first piece without the tab using some of the Best Glue Ever.  Once this is done, fold in and adhere the tabs on both ends usingthe Best Glue Ever .  Then fold and adhere, using the Best Glue Ever,  the rest of the flaps to make one 3 1/4 long piece.  

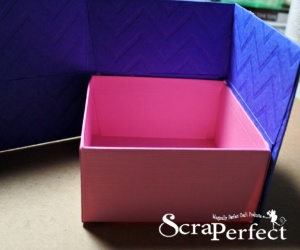
To adhere the drawer, you want to start with the right hand side of the side piece, create a right angle with the right 2 sections and lay a drawer within that angle making sure that the drawer fits in the angle and then glue it in place using the Best Glue Ever .  For the second drawer you want to adhere it using some of the Best Glue Ever, the same way but on the left hand angle making sure to line it up with the top edge so it doesn't hit the bottom drawer. 


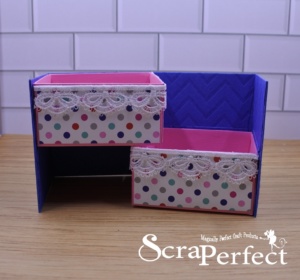
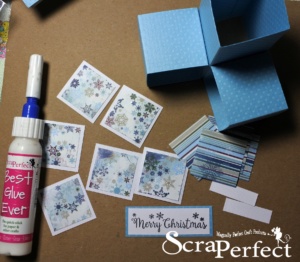
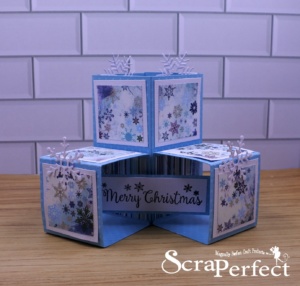
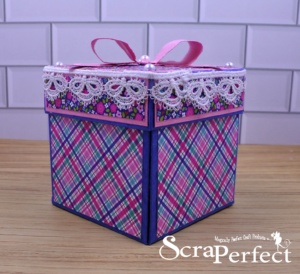
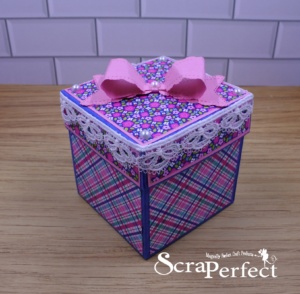
Next comes the fun part, decorating your box.  You can decorate it any way you want.  For my box, I added some plaid card stock to the sides of the box.  For the drawers, I added some dotted card stock and some lace around the top to each drawer.  For the lid of the box, I added some flowery card stock layered onto some pink card stock to the top and sides.  I added some lace around the top of the lid.  Then using some of the Best Glue Ever and the Embellie Gellie, I added some flat backed pearls to each of the corners.  I used a die to make a bow and attached that using the Best Glue Ever. 


That's it for today - until next time. Happy Crafting with ScraPerfect!!

ScraPerfect Products Used: